Installation
Download the ams-stamp-x.y.z.jar file from here and
place it under the /usr/local/antmedia/plugins directory of your media server.
cd /usr/local/antmedia/plugins
sudo wget https://streamtoolbox.com/download/ams-stamp-2.0.0.jar
sudo touch /usr/local/antmedia/conf/stamp.conf
If you have purchased a license, copy the license file into the /usr/local/antmedia/conf directory.
If you don’t have a license file, the software will log a message and will start in time limited trial mode.
Restart Ant Media Server using sudo systemctl restart antmedia.service
You should see the below messages when your Live application starts up:
22:42:06,506 [Loader:/LiveApp] INFO  i.a.AntMediaApplicationAdapter - LiveApp started
22:42:06,509 [Loader:/LiveApp] INFO  io.antmedia.plugin.StampPlugin - Stamp Plugin is starting in LiveApp
22:42:06,509 [Loader:/LiveApp] ERROR io.antmedia.plugin.StampPlugin - No Stamp license file found in default location conf so entering trial mode
22:42:06,509 [Loader:/LiveApp] INFO  io.antmedia.plugin.StampPlugin - Stamp version: 2.0.0 - License fingerprint: TRIAL-1
22:42:06,509 [Loader:/LiveApp] INFO  io.antmedia.plugin.StampPlugin - Stamp license owner: nobody
22:42:06,509 [Loader:/LiveApp] INFO  io.antmedia.plugin.StampPlugin - Stamp license expiration date: 2023.07.29
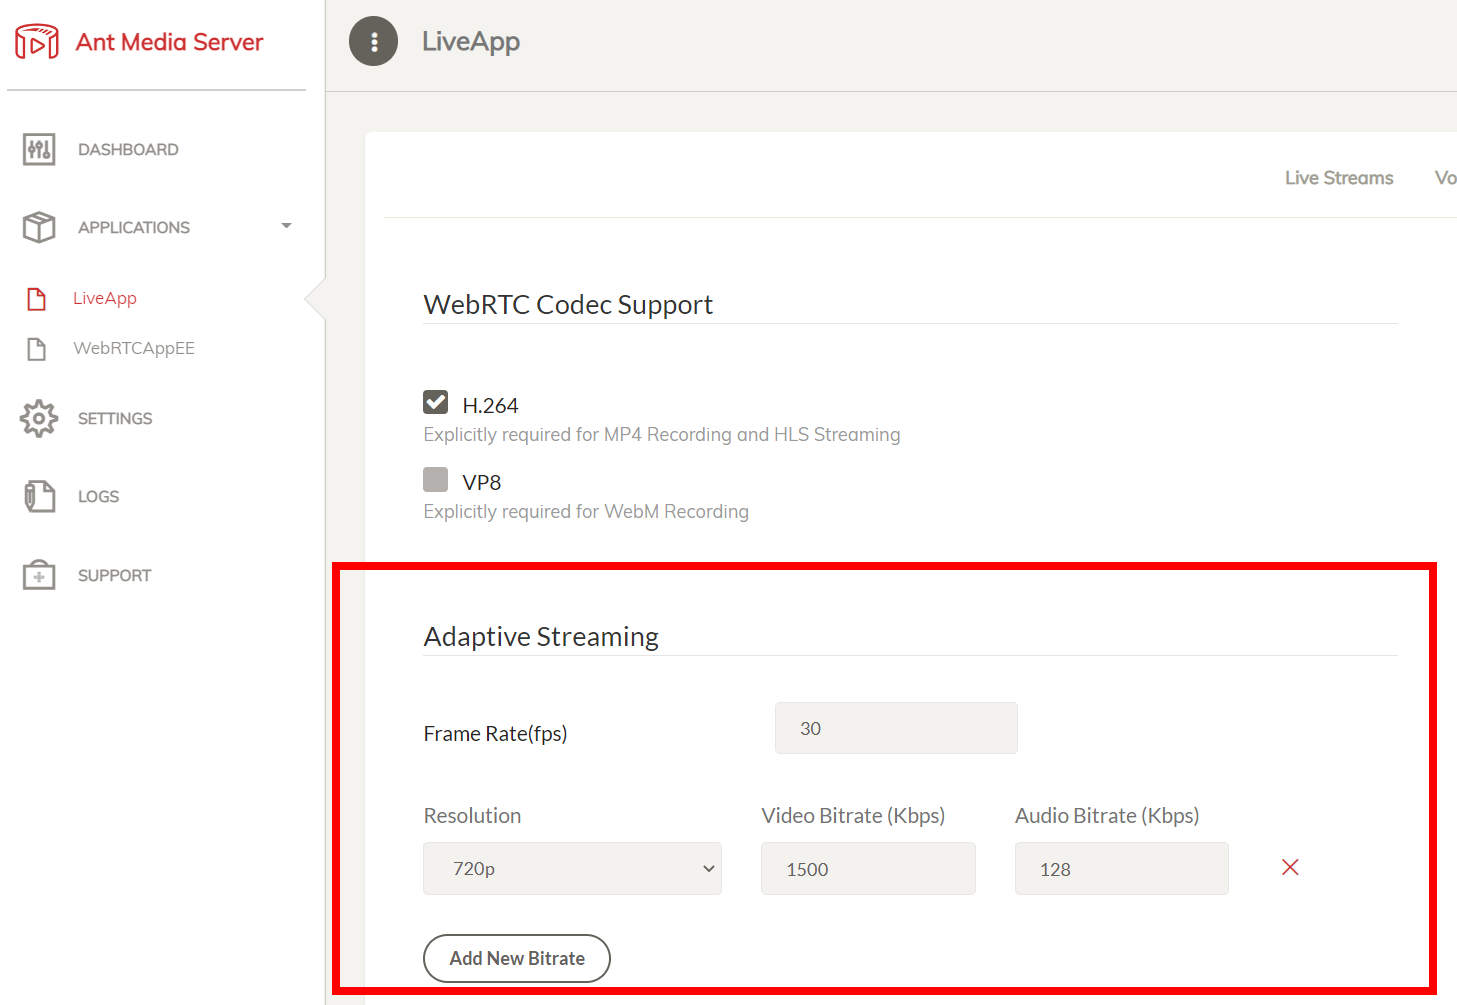
Open the configuration settings of LiveApp and turn on Adaptive Streaming, add at least one rendition:
To secure the REST API of Stamp it is highly recommended to configure JWT token authentication based on this guide.
By default the LiveApp has the Enable IP Filter for RESTful API restriction turned on.
If you wish to access the Stamp API from external servers, please turn this setting off or
set the desired source IPs.
Publish a stream to LiveApp and verify that the logs contain these messages. You can publish the
stream from vMix, OBS or just simply use ffmpeg from command line:
wget https://streamtoolbox.com/download/big_buck_bunny_720p_h264.mov
ffmpeg -re -i big_buck_bunny_720p_h264.mov -c copy -f flv rtmp://localhost:1935/LiveApp/bunny
22:42:20,111 [vert.x-worker-thread-25] INFO io.antmedia.plugin.StampPlugin - Registering Stamp frame listener in stream myStream
You might see messages related to frame processing time, especially when the stream starts and the very first frames are modified. After an initial warmup these messages should go away if you are running with the right capacity server.
22:42:20,514 [vert.x-worker-thread-31] WARN i.antmedia.plugin.stamp.StampEngine - Frame processing on myStream took 31ms which is above the 85.0% of the interval calculated from the 29.0 fps in LiveApp. If you see this message often, your server is struggling with the load.
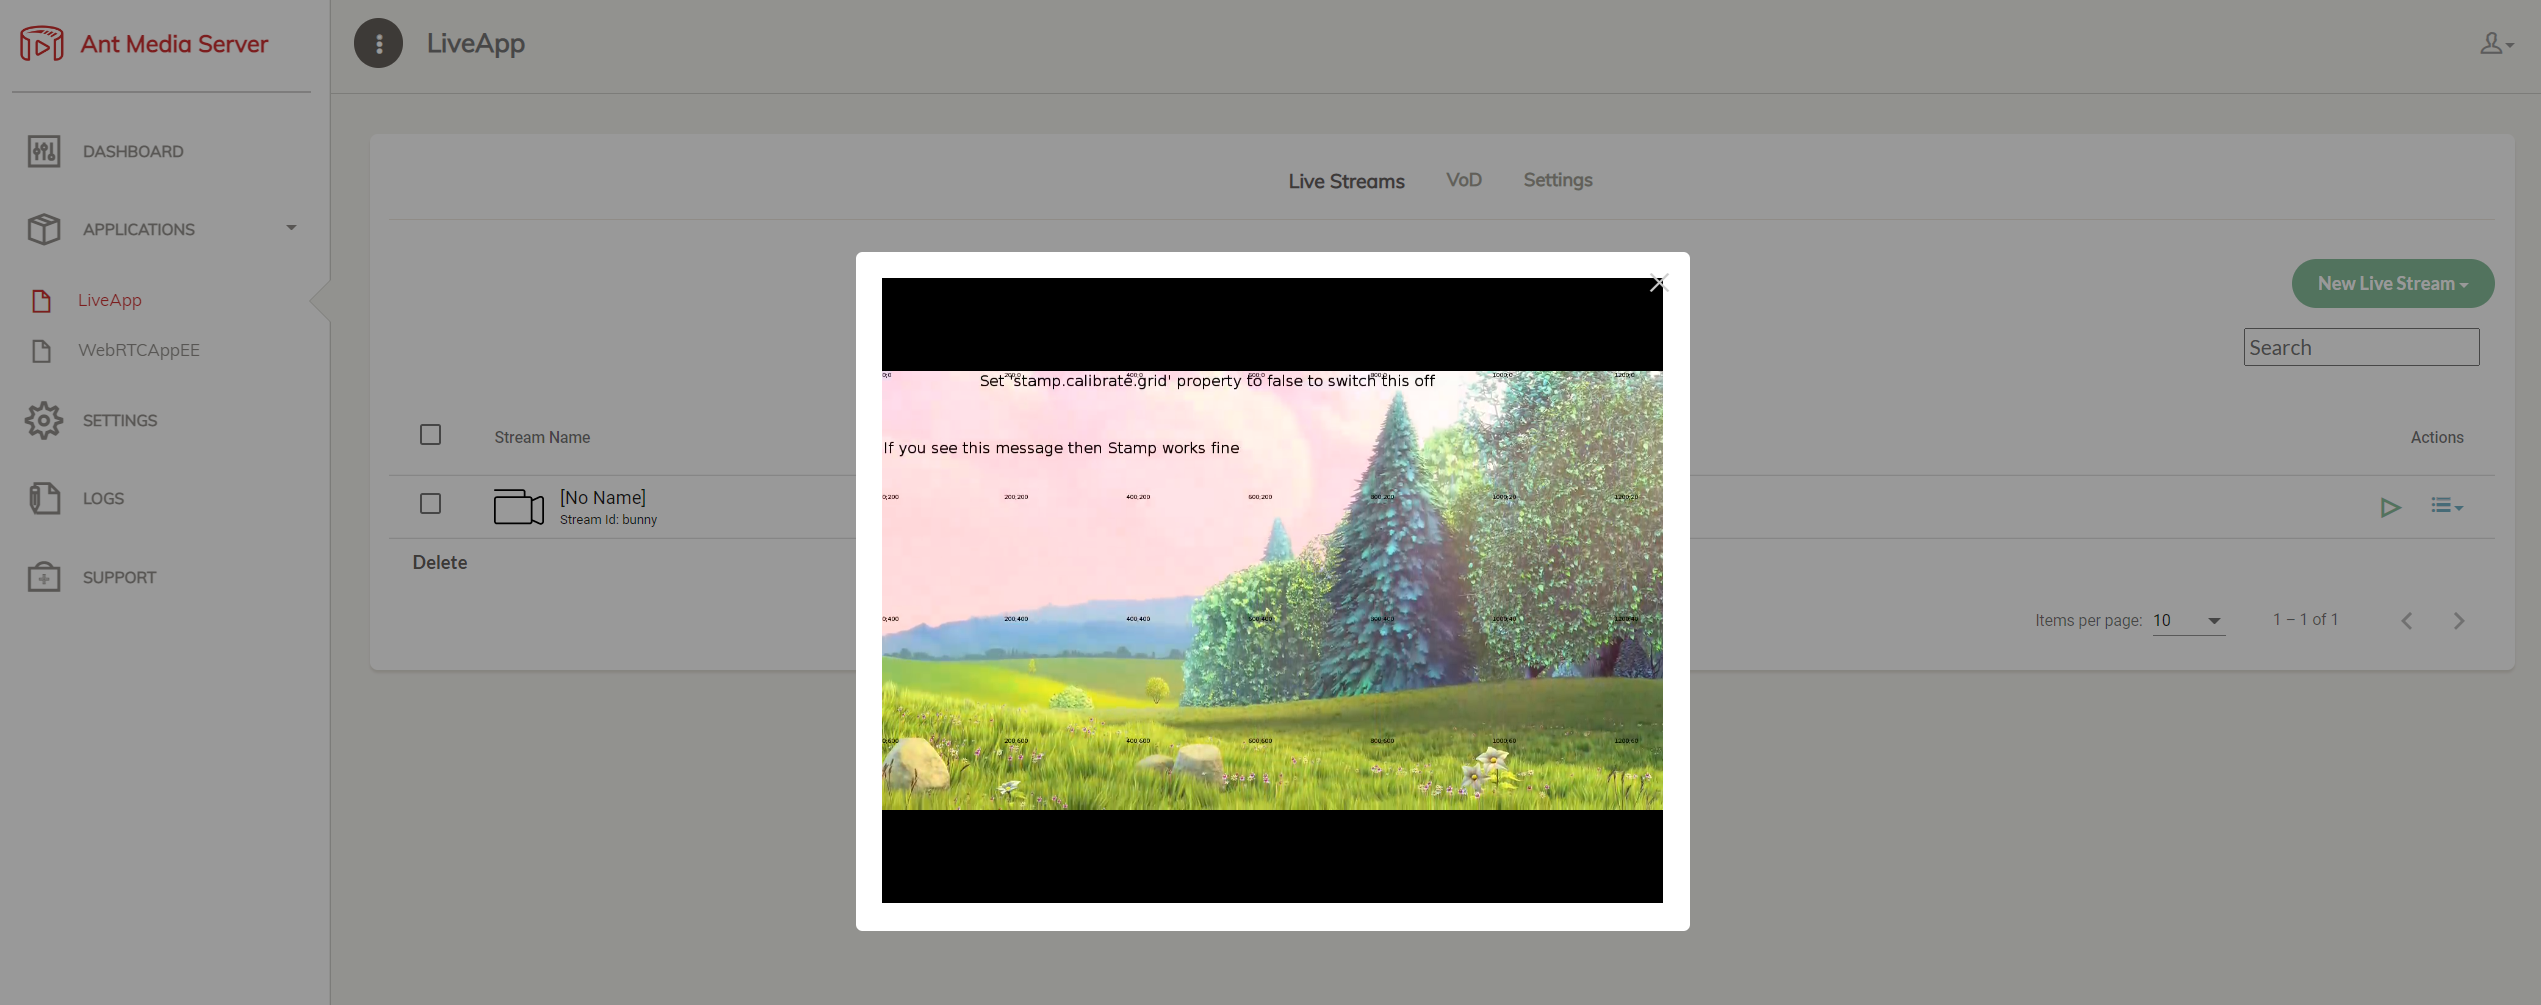
Verify that you see a calibration grid and a welcome message when you play back your published stream:
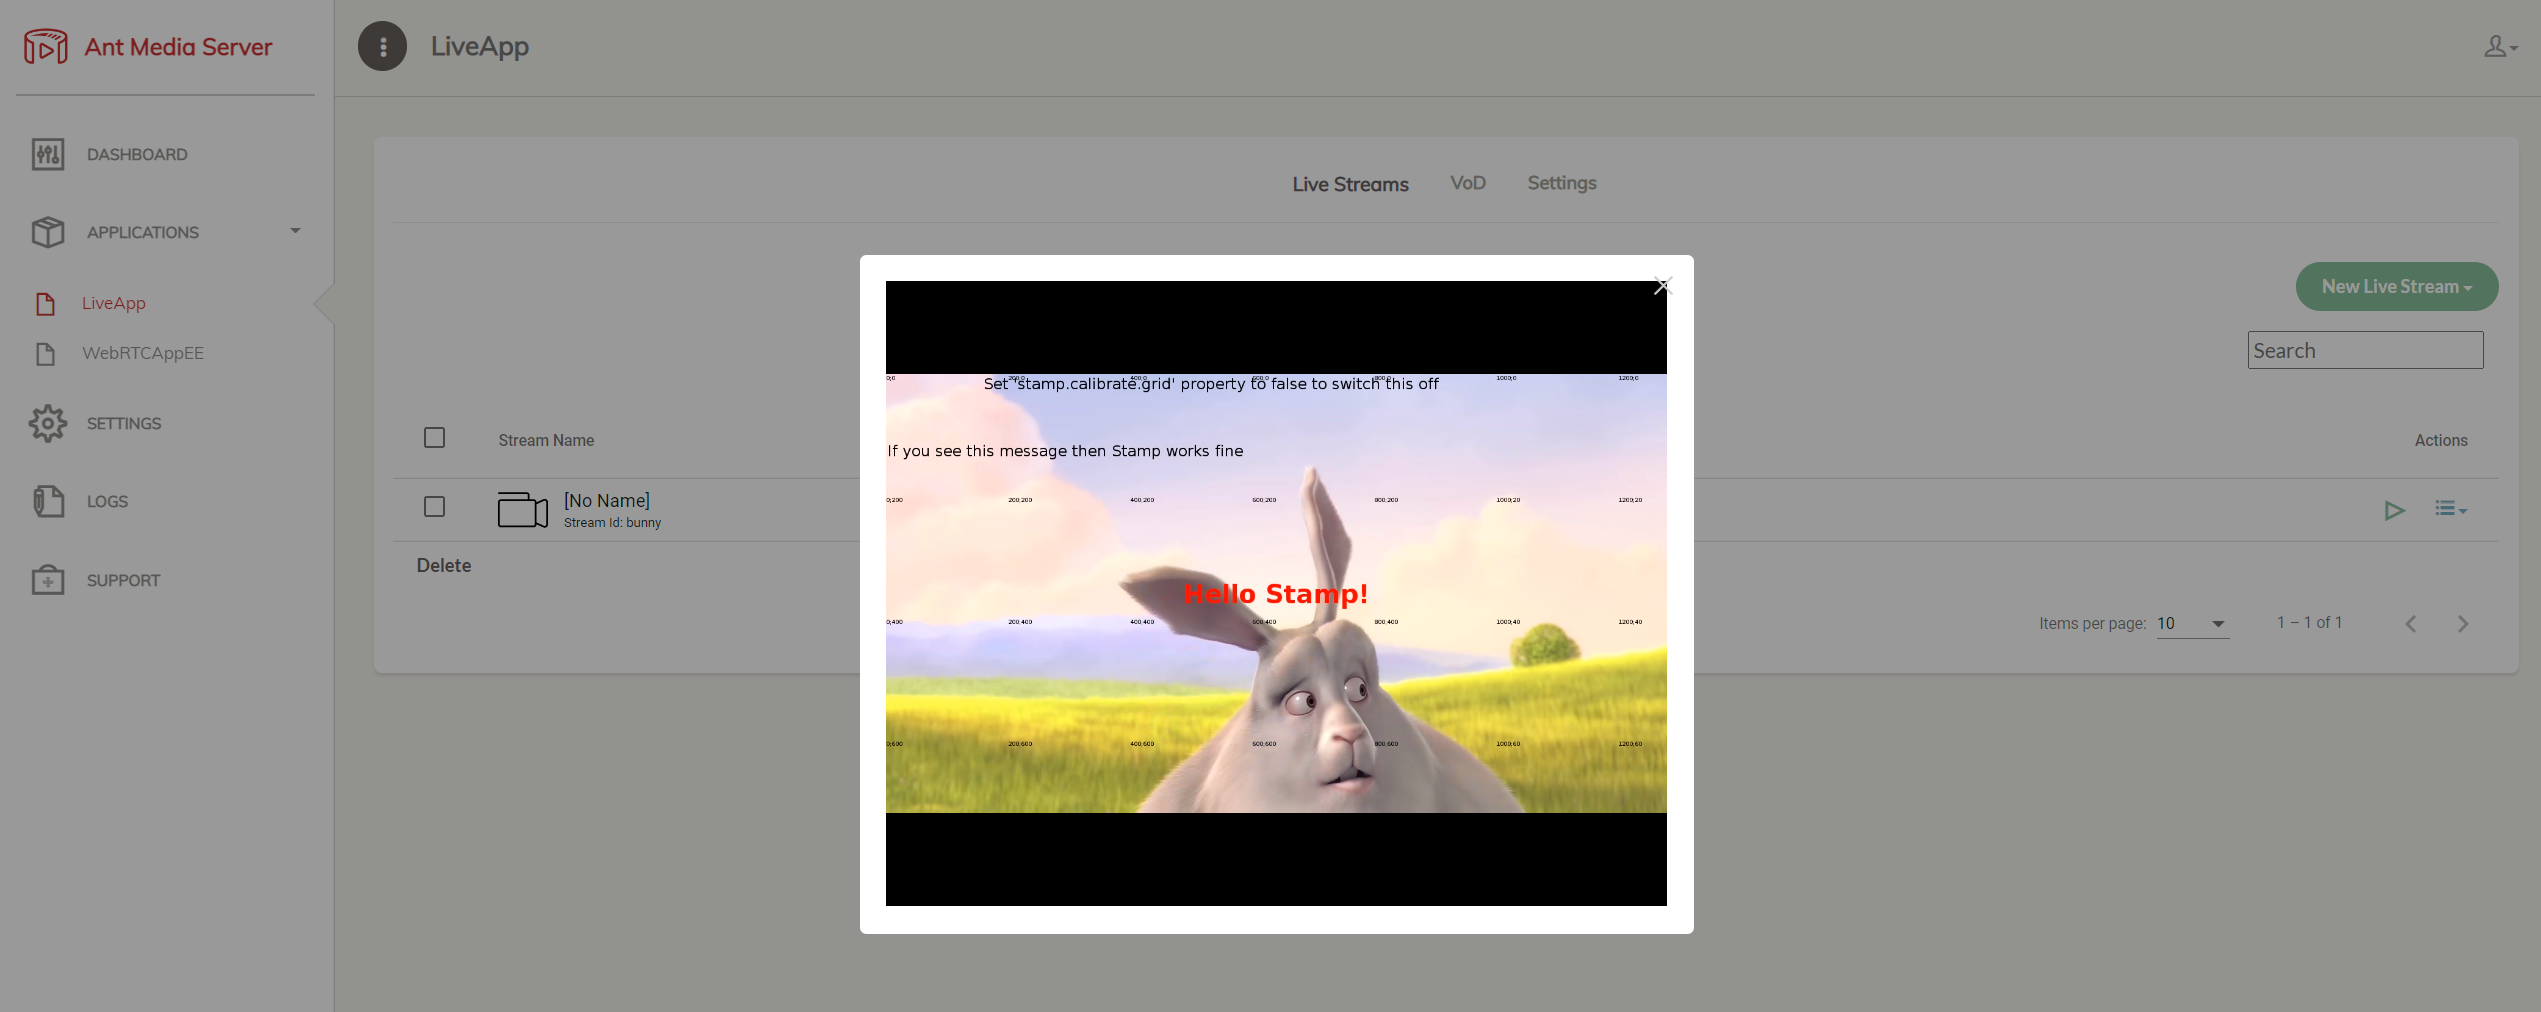
Send in an example API request from command line:
curl --location --request POST 'http://localhost:5080/LiveApp/rest/stamp/instructions' \
--header 'Content-Type: application/json' \
--data-raw '{"id": "overlay-1","start":"now+1","duration": 30,"text":"Hello Stamp!",\
"style":{"color":"red","size":42},"position": {"x": 0.5, "y": 0.5, "anchor":"center-center"}}'
You should see the hello message showing up on the video stream shortly.
Once you reached this point, it makes sense to turn off the calibration grid:
echo "stamp.calibrate.grid=false" | sudo tee /usr/local/antmedia/conf/stamp.conf
sudo systemctl restart antmedia.service
Using the GPU
Video manipulation is very resource intensive and it is highly recommended to use GPU. You can find information on how to configure Ant Media Server to use GPU here: https://resources.antmedia.io/docs/en/using-nvidia-gpus
HTML Overlays
(from version 2.0.0)
If you intend to use any of the HTML overlay features in Stamp, you need a running instance of Selenium that performs the actual rendering. The simplest way to do this is by running the below Docker command:
$ sudo docker run -d -p 4444:4444 -p 7900:7900 --shm-size="2g" \
   -e SE_NODE_GRID_URL=http://yourDomainOrIp:4444 -e SE_NODE_SESSION_TIMEOUT=99999 \
   -e SE_NODE_MAX_SESSIONS=10 selenium/standalone-chrome:114.0-chromedriver-114.0
Once started up, it starts up Selenium in a container and Stamp will be able to
communicate with it through port 4444. By default Stamp is expecting the Driver to
be accessible on http://localhost:4444 so you don’t need to override the default value
of the stamp.chrome.driver.url configuration option.
You can find example API calls that make use of HTML overlays in the Examples section.